This guide provides practical steps to help you safely and effectively transport a scissor lift.
Step 1: Preparation and Safety Measures
1.1 Check the Manual
Before beginning, review the manufacturer’s guidelines specific to your scissor lift model. This will provide essential information on safe transportation, including weight, tie-down points, and other specifications. Each lift is different, so understanding its unique requirements is crucial.
1.2 Inspect the Scissor Lift
Conduct a quick inspection of the scissor lift. Check for any loose parts, leaks, or mechanical issues that may affect transport. Ensure the hydraulic components, platform, and wheels are in good condition.
1.3 Secure the Lift Arms and Lower the Platform
Retract and lock the lift arms in their lowest position, which helps maintain stability. Lower the platform completely to reduce height and stabilize the center of gravity. A lower center of gravity makes the lift less likely to tip over during transport.
1.4 Disconnect Power
For electric scissor lifts, turn off the power and, if recommended by the manufacturer, disconnect the battery. This precaution prevents accidental activation during transport.
Step 2: Choosing the Right Transport Vehicle
2.1 Use a Flatbed Trailer or Truck
A flatbed trailer or truck with a loading ramp or lift gate is typically the best choice for transporting a scissor lift. Ensure that the trailer or truck has the necessary weight capacity and sufficient space to accommodate the specific model of the scissor lift you’re transporting.
2.2 Confirm Vehicle Specifications
Check the weight and size specifications of both the transport vehicle and the scissor lift. Make sure the vehicle can safely handle the load without exceeding its limits. Overloading can compromise safety and potentially lead to vehicle failure.

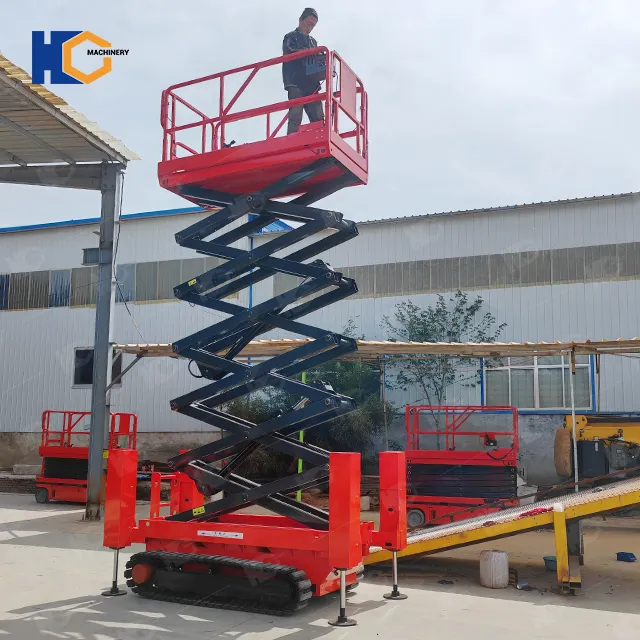
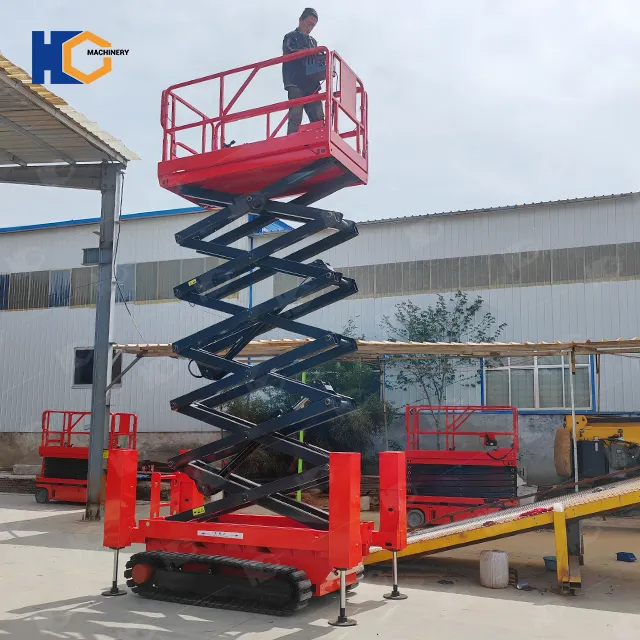
This image features a red and black scissor lift with a man standing on the elevated platform, likely testing or inspecting it. The scissor lift has a rugged design with a tracked base for stability on rough surfaces, making it ideal for outdoor or uneven terrain. This type of scissor lift appears to be designed for significant height reach, and its sturdy construction suggests it can support heavy loads and multiple safety mechanisms, such as stabilizing legs at the base.
This lift would require careful handling and secure transportation due to its size and weight. Here’s a quick outline of considerations based on this type of equipment:
Preparation: Ensure the platform is fully lowered and the scissor mechanism is locked in place before loading.
Loading: A flatbed truck with a strong loading ramp or lift gate is ideal for this kind of scissor lift, given the large base and tracks.
Securing: Use heavy-duty chains or ratchet straps attached to the frame to prevent movement during transit.
Unloading: Ensure a stable surface, as the stabilizing legs should be deployed for extra security before elevating the platform for work.
This scissor lift's structure and mobility make it suitable for construction, maintenance, or industrial tasks where stability on uneven ground and significant reach are required
Step 3: Loading the Scissor Lift onto the Transport Vehicle
3.1 Position the Ramp or Lift Gate
If the trailer or truck doesn’t have a built-in ramp, use a portable loading ramp rated to support the weight of the scissor lift. Ensure the ramp is secure and set at a manageable angle to safely drive or push the lift onto the vehicle.
3.2 Drive or Push the Scissor Lift Up the Ramp
If the scissor lift is self-propelled, drive it slowly up the ramp, maintaining steady control to avoid sudden movements. If it’s not self-propelled, enlist help to push it up the ramp safely. Make sure all personnel involved are wearing appropriate safety gear, such as gloves and steel-toed boots.
3.3 Use a Winch if Necessary
For larger or heavier lifts, using a winch can provide extra control. Attach the winch cable securely to the designated points on the scissor lift, and gradually pull it up the ramp. A winch reduces the risk of the lift rolling back and offers more stability during loading.
Step 4: Securing the Scissor Lift for Transport
4.1 Use Heavy-Duty Chains or Ratchet Straps
Secure the scissor lift to the transport vehicle using high-strength chains or ratchet straps. Attach these to the designated tie-down points on the lift and the transport vehicle. Avoid attaching to weak or movable parts, as these may not withstand the tension.
4.2 Attach Straps to Strong Points
Ensure the straps are fastened to sturdy points on the scissor lift, such as the base frame. Tighten each strap securely, but avoid over-tightening, as this could damage components of the lift.
4.3 Double-Check Stability
After securing the lift, check its stability by gently pushing it to confirm that it won’t move. Re-tighten straps or chains as needed, ensuring there’s no slack. Secure all straps and ends to prevent them from flapping or coming loose during transport.
Step 5: Transporting the Scissor Lift
5.1 Drive Carefully
Drive slowly and cautiously, especially on curves, turns, or rough terrain. Avoid sudden movements and hard braking, as these can shift the lift’s weight, potentially destabilizing it. If traveling long distances, maintain a moderate speed to reduce the risk of the load shifting.
5.2 Observe Height and Width Restrictions
If the scissor lift has a high clearance, be mindful of height restrictions such as bridges, overpasses, and tunnels. Measure the height of the loaded vehicle to ensure it can pass through safely. Similarly, check for width restrictions, as some scissor lifts may require permits for wide loads.
5.3 Periodic Checks on Long Journeys
For extended trips, stop periodically to inspect the straps, chains, and general stability of the lift. Adjust and tighten if necessary to ensure the load remains secure throughout the journey.
Step 6: Unloading the Scissor Lift
6.1 Choose a Flat, Level Surface
Park the transport vehicle on a level surface before unloading. This minimizes the risk of the lift rolling or tipping unexpectedly. Ensure the area around the vehicle is clear and free of obstacles.
6.2 Release the Straps and Chains Carefully
Slowly release each strap or chain, taking care to control any tension that may have built up during transport. Keep clear of the path of the lift in case it shifts slightly as the restraints are removed.
6.3 Use the Ramp or Lift Gate to Unload
Slowly back the lift down the ramp or use a winch if available to control its descent. Move cautiously and ensure there are no sudden movements. If the lift is not self-propelled, enlist help to guide it down the ramp safely.
Additional Tips for Transporting a Scissor Lift
Check Local Regulations: In some regions, transporting heavy equipment may require specific permits or have legal regulations. Ensure compliance with local transport laws to avoid fines or complications.
Use Warning Flags or Signs: For wide loads, use warning flags, lights, or signs as required by law. This alerts other drivers and helps maintain safety on the road.
Hire Professional Help for Large Lifts: For very large or heavy-duty scissor lifts, consider hiring a professional transport service with expertise in handling heavy equipment.
Conclusion
Transporting a scissor lift requires careful preparation, the right equipment, and an understanding of the safety measures involved. By following these steps, you can ensure the scissor lift is safely and securely transported to its destination. Remember that every scissor lift model may have unique requirements, so always refer to the manufacturer’s guidelines for specific instructions. With proper planning and attention to detail, you can transport a scissor lift effectively, safely, and with minimal hassle.


